The folks here at MeasureNet have been hard at work integrating new probes into our system and creating new experiments. In this blog entry we'll be introducing the following new experiments and probes:
- Thermometric Titrations
- Conductivity Probe & Experiment Options
- Colorimetric Titration Hardware
Thermometric Titrations
The newest software integrates the drop counter and temperature probe and now has the capability to conduct experiments with Temperature vs Drops. This allows users to conduct Thermometric Titrations.
Conductivity Probe & Experiment Options
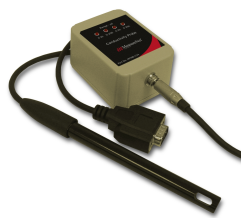
MeasureNet now offers a 4 range high resolution conductivity probe. MeasureNet provides users the ability to conduct experiments with Conductivity vs Time and use the drop counter for Conductivity vs Volume for Conductometric Titrations.
Colorimetric Titration Hardware
MeasureNet systems now have the ability to conduct colorimetric, Fluorometric, turbidometric and chemiluminescent titration experiments. When ordering colorimeters, customers can specify if they would like them customized for photometric titrations. The kit includes a colorimeter, a base stand, a pump with power supply, and custom-made flow cell that pair with the MeasureNet colorimeter and drop counter.

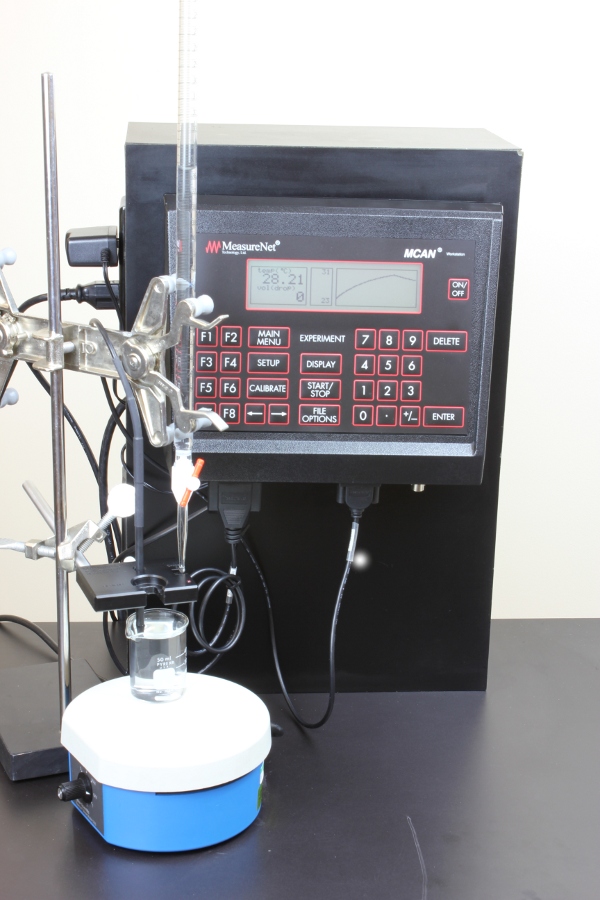
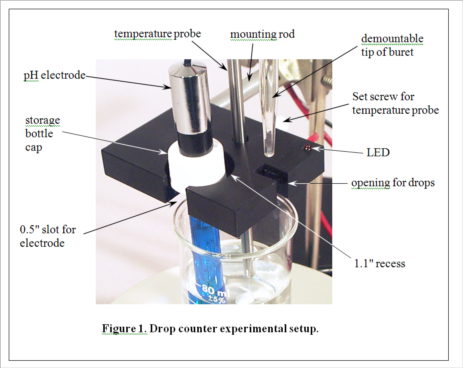
Development of MeasureNet’s optical drop counter began in 2000. Our goal was not only to automate, simplify and shorten the time for pH titration experiments, but also to improve the accuracy of students’ measurements. During its development, various innovative features were added to the design, as seen in Figure 1. MeasureNet’s Multi-Functional Drop Counter holds both a pH probe and a temperature probe, reducing the hardware needed to set up pH titration experiments, and the geometry was optimized to allow the use of small beakers and samples.
Before the days of optical drop counters, simple wire electrical conductivity devices were the only automated and economical solutions for pH titrations in the teaching laboratory. A drop from the buret would make contact with two bare wires positioned closely together, creating a conductive current path. An electronic circuit would then convert this current into a pulse that was counted. A student could then calculate volume based on the number of drops and the average drop size, determined in a separate experiment. The MeasureNet system automatically determines the average drop size in each titration.
The most common method of performing pH titrations is the manual method. The drawbacks to this method:
Time consuming, giving students time to perform few titrations in a lab period.
-
Larger reagent volumes required, making titrations more expensive in terms of reagent usage and disposal.
-
Requires repetition for students to master endpoint detection with reasonable precision.
The 22nd BCCE at Penn State University marks the 10th anniversary of MeasureNet Technology’s introduction of the Optical Drop Counter to the chemical education community. During this decade, the MeasureNet drop counter has become a star in chemistry labs around the country and the world, performing a variety of functions even its designers had never imagined. MeasureNet’s drop counter allows students to leap past the typical pH titration experiment and engage in other interesting and educational titration methods like thermometric, potentiometric, amperometric and colorimetric titrations.
MeasureNet Technology's introduction of the industry’s first Multi-Functional Optical Drop Counter technology in 2002 at the 17th BCCE at Western Washington University obviously caught the attention of the conference attendees and venders. The MeasureNet drop counter has emerged as the industry standard, copied by all its competitors, such as Vernier Software & Technology, Pasco Scientific and MicroLab Inc. MeasureNet is both flattered by this attention and inspired to do more to bring innovative technology into the teaching laboratory.
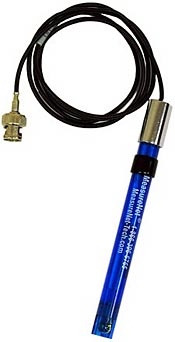
MeasureNet's ElectroJelly™ pH electrode has been designed with students and the chemistry teaching lab in mind. What is ElectroJelly™? It is a solid material with highly concentrated salt (most times it is KCl) that can effectively hold reference electrode electrolytes and prevent it from contamination by sample back-flow. The ElectroJelly™ filled (sealed) electrodes have a longer life and need less calibration than regular gel filled electrodes, saving time and money. Two other features unique to the MeasureNet pH probe are the SilverCap™ for noise reduction while handling the probe, and the epoxy body design uses holes instead of tabs too better protect the glass bulb from the rough handling of students. You use the pH probe with our Drop Counter for pH titrations.
ElectroJelly™ pH Electrode Features:
- Superior Stability
- Fast response
- Minimum sodium (alkaline) error
- pH 0 -14 full range measurement
- Special internal fill offers full range linear temperature compensation
- Very low sensor glass membrane resistance
- Zero and Isopotential: ~pH 7
- Unique Glass Bulb protection design
MeasureNet's ElectroJelly™ probes are ideal for undergraduate research projects. The probe's stability and long life span are ideal for 24/7 monitoring applications and experiments involving temperature cycling. If pH titrations are an fundamental part of your curriculum or research, the ElectroJelly™ probes stability and rapid response time makes it the perfect choice.
Electronic Measurement and Data Collection in the Chemistry Laboratory
Hands-on Experiment - pH Titration Curve
In this experiment, you will generate a titration curve for an unknown acid or base. Using a drop counter, you will add titrant and display a plot of pH vs. drops on the MeasureNet™ workstation.
Procedure
Calibrating the pH electrode
1. Move the black band on the pH electrode to uncover the hole in its side. Mount the electrode in a vertical position with a universal clamp on a ring stand (not the same one holding the burets), and connect it to the workstation. Place a waste beaker under the electrode and rinse the electrode with distilled water, then gently touch a Kimwipe to the electrode tip to remove the remaining drop of water. Pour a sample of a standard buffer solution into a disposable cup. Lower the pH electrode into the solution.
2. Press MAIN MENU on the workstation. A list of measurement types will appear on the screen. (Make a note of the station number listed at the top of the screen.) Press the function key listed for pH, then the function key for pH versus drops, and then press CALIBRATE. Follow the instructions on the screen, which will prompt you first to enter the temperature (if not known, just assume ~22°C), then to enter the known pH of the standard solution, and finally to monitor the pH displayed. Be sure to press Enter after the pH reading becomes steady. You are performing a single point calibration, so press F1 when prompted by the message on the workstation screen. Press DISPLAY and note the pH value on the workstation screen. If it is not within 0.02 pH units of the actual pH of the standard buffer solution, you should redo the calibration.
Titration Experiment
(Consult Figure 1 on the last page for a picture of the experimental setup.)
3. Select an unknown solution, which will contain either a mono- or diprotic weak acid, or a mono- or dibasic weak base. Pipet 25 mL of the unknown solution into a 50-mL beaker equipped with a stir bar. Place the beaker on the center of the stir plate. Place the pH electrode in the holder in the drop counter, and lower it into the beaker (near the wall of the beaker to avoid the stir bar) so that the protective shield rests lightly on the bottom of the beaker. Clamp the drop counter to a ring stand. Turn on the stir plate so that the stir bar is turning at the lowest sustainable speed. Note the initial pH of the solution. Based on this pH, decide which titrant (HCl or NaOH) you will use to titrate the solution. Fill a 50 mL buret with the appropriate titrant.
4. Position the buret containing the selected titrant so that its tip is over the appropriate opening in the drop counter, making sure that this is also over the beaker, probably near the wall opposite the pH electrode. It gets a little crowded here, and you will need to take care not to change the position of the beaker in the center of the stir plate. Don't let any titrant fall into the sample yet! When everything is arranged as in Figure 1 (except the temperature probe, which we aren’t using in this experiment), begin the titration by pressing START/STOP on the workstation. The station will first ask you to enter the starting reading on the buret. It need not be exactly 0.00 mL. Just read what it is and enter the appropriate value. The station display will now show the pH and the number of drops counted, 0 so far. Carefully turn the stopcock on the buret to begin adding the titrant. The red LED on the drop counter will flash each time a drop is counted. Try to maintain a rate of approximately 1 drop per second. A flow restrictor is used in the stopcock to make this easier to accomplish. Your only duty while the titration is running is to monitor the drip rate and make small adjustments of the stopcock if needed.
5. When you have followed the titration far enough, press START/STOP to stop the titration. The station will now ask you for the final volume reading on the buret. Read and enter the value.
6. Print your titration curve. Press FILE OPTIONS, read the menu that appears, and press the function key listed for PRINT DATA (standard). Enter the number of copies to be printed, and press ENTER. Your plots will appear on the printer attached to the PC. They will be labeled at the top with your station number.
7. Use the printed plot to estimate the pKa(s) for the substance you titrated, then ask the instructor to compare your results with what was expected for your unknown.